Archived Ideas for ‘Home’

IDEA 101: MUSICAL CHAIRS

Last winter was a long one in the midwest. And to keep myself from pining away for my Up North House project, I spent it figuring out the dining room. (If you’re curious about this project, click the “blog” button at the top of the page and back up and read the blog from Idea #96 “Honor a Memory”).

We decided for our big group we need a huge harvest table, so large we will have to make it, with (for now) 20 chairs. I say ‘for now’ because you have to start somewhere. But we will probably add a bench or two for those occasions when we need to squeeze in more.

Like most families we are not made of money. So solutions have to be clever, and often I find throwing more time than money at a problem is not just thrifty, but results in a much more creative and inviting space.

Case in point: the twenty chairs.

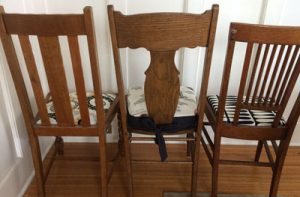
If you haven’t bought new dining room chairs recently, you would be in for sticker shock. Multiply that by 20 and I will tell you this is not something that fits into my budget. In a conversation with my daughter one day we came up with a plan. I began haunting Craig’s List for sturdy wooden chairs. I decided I would not even look at anything over $25 a chair. I was immediately inspired by what I found and began buying chairs. I didn’t buy if there were less than four of the same chair. I felt this amount of variety would work better than if they were ALL different. I ended up with five sets of four chairs. Two of the sets are almost identical but one has caned seats and the other, solid wood.

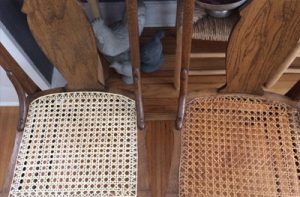
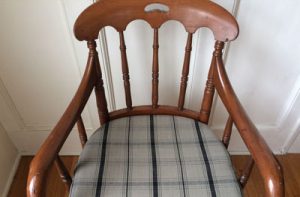
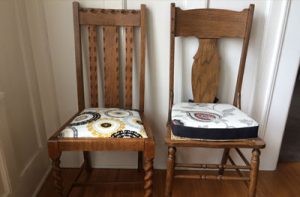
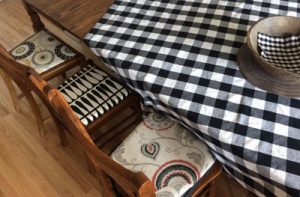
We set up the glue factory in the basement and glued/clamped and tightened all that needed it. I went on YouTube and learned how to cane so I could repair the few that needed that. This pic shows my newly caned version (left) next to an original. While the fresh cane is pale in color, it will darken naturally with age.

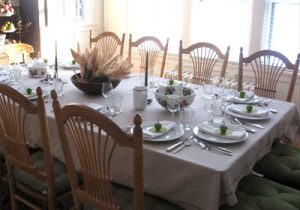
Then I spent the rest of the winter finding and sewing a lively/casual/interesting collection of fabric for seats and chair pads.

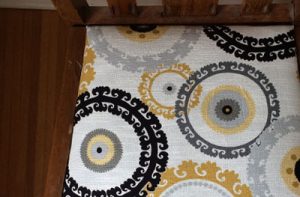
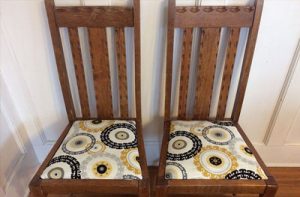
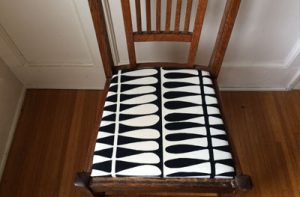
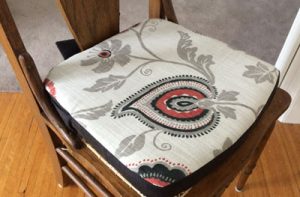
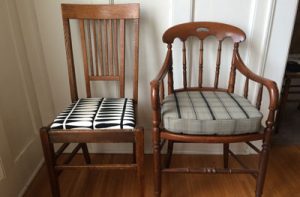
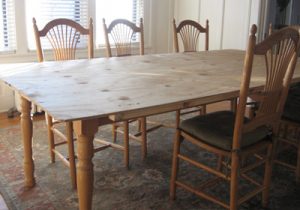
It was fun to figure out fabrics that did not match but were each special for the chair it went on, and somehow managed to live together just right. I bought 20 chairs and three tables from Craig’s List and since I wasn’t shopping for tables I figured I ended up spending an average of $18 per chair if you count the three tables as thrown in for free. Actually, the tables came in handy as we lined them up and pretended they were one long harvest table. This will do, until we can make that spectacular table of our own!

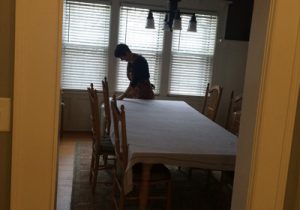
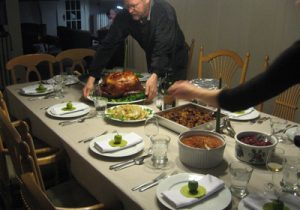
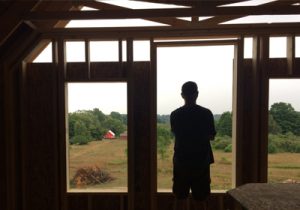
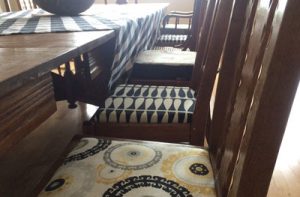
And here is how they look in the house.

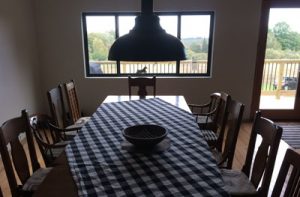
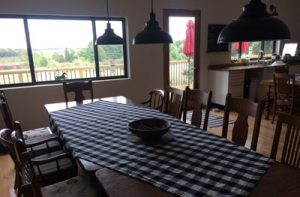
Now that we’ve shared many family meals I can report these are working just fine for our lively/casual/interesting group. And there’s always next year to work on the bedrooms!

Keep track of our house project by following #conboyhouseupnorth on Instagram.

IDEA 100: EXTEND THE INVITE

Now that I’m home for the holidays, it seems more important than ever to gather the biggest bunch of loved ones to the Thanksgiving table. I know it’s not essential to actually get everyone at the same table, but this little trick could be just the thing if that’s what you’re after.

With the help of a single 4′ x 8′ sheet of plywood, our dining table became big enough to seat 12!

All we did was round the corners so as to avoid hip-pokes, and attached blocking, one on each side, just outside the tabletop underneath. This makes the top quite stable, and keeps the board from moving anywhere. Don’t actually attach anything to the table.

Put a large tablecloth over the whole thing and no one will ever know the difference.

I find you can comfortably seat four on each side and two on each end. And more than that if you have benches and small children.

It’s so fun to have a big generous table. You may decide just to keep it that way all year! Have a wonderful Thanksgiving. And may you have as many at your table as you wish!

IDEA 99: BE FLEXIBLE

It’s already October. The temps have been dipped long enough that it seems like they may not recover, and there have been more clouds and rain than sun in a very long time.

My mission starting the beginning of the year was to take a year off work and spend the summer working on our multi family vacation home. (This is my fourth post about it, if you want to go back and read!) Every August we have a big family reunion and while we enjoy doing most of the cooking and eating outside, finding places to sleep can be hard. A little tiny piece of me thought if the building was enclosed by then we could have a grand camp-out on the floor. Spoiler alert: that didn’t happen. In August the top floor of the house was still missing, so there were a lot of tents pitched.

We hired an amazing local contractor to build the shell and we were planning on taking it from there, thankyouverymuch. We reasoned we’ve (well, my husband has) put in electrical, we’ve (well, him again) has done lots of plumbing. As long as the big boys put up walls and a roof, we would spend (in my view) a magical, worry-free summer hanging and mudding drywall, laying wood floors, painting, tiling, etc, etc etc.

Obviously it didn’t quite turn out that way. In precious few weeks I will be forced to go back to civilization and furnace heat, and we haven’t laid a single tile, painted a single wall, placed a single floorboard.

The first mishap happened when the site was still dirt. Since we wanted a shower in the basement, the plumber dug and buried the first pipes in the ground. Many weeks later, the walls went up around them and I could see that the drain pipe was not where it was supposed to be and now the drain wouldn’t be centered in the shower. It’s really important (to me, anyway) to have the drain centered. And one of the walls could not move as it had the stack in it. So, I asked for the other wall to move in and lost several inches of space in the shower (which we gained in the rest of the bathroom). By the time I finally saw the plumber again I mentioned the error and he said when he was digging he came upon a huge bolder that couldn’t be moved. So he put the pipe as far over as he could. In the end, I think improvising an alternative plan saved us all from a lot of stress and heartache.

So began the process of flexing.

My summer of DIY became my summer of watching DIY videos while being available if needed, and posting the progress on Instagram. 

As the walls went up it was easier to see what I had designed. Occasionally, there would be something that just didn’t look right. Sometimes it was because the carpenters went off the plan. Sometimes it was that they stuck to the plan but it just didn’t work the way it was supposed to. Sometimes it was just because code said it had to be that way. With such a wonderful, professional crew, we had a lot of communication, and whether it was my boo-boo, theirs, or nobody’s, we talked it through and came up with solutions.

Probably the biggest turn was that I realized I was dreaming if I thought we could string the electric (or heating ducts and vents or plumbing pipes). OK I knew we couldn’t do the plumbing pipes-that was on the contractor’s list already. But since these other things were not included in our contract, I received a trial-by-fire education on how to be the contractor and hire subs.


At one point, my brother climbed a ladder to look out the second floor and asked why the hell I hadn’t designed more windows in the front where the view was breathtaking. I had put big windows on the main floor below, but the upstairs had bedrooms so I had treated them more traditionally.

The original window plan:

Fortunately, I had two windows I wasn’t planning on using. I had designed them in and then found out they came too close to the floor for code. The upper walls hadn’t been framed in yet, so I got back on the computer and found that I could create a pretty, and very window-fied wall by using one of the big windows flanked by what had been marked for the front and back bedrooms. With the shorter windows on each side I could raise the bottoms to fit within code and it didn’t look odd because the smaller windows justified the height of the lower edges. Then I used the other large one in the back where it neatly framed a giant oak tree. You don’t really notice it’s riding quite high in the room (almost to the ceiling). All you notice is the magnificent tree.

The new window plan:

The morning I went down to the build site to ask the carpenter about the change, I was pretty nervous. Even if I don’t have it all under control, I like to pretend I do, and to admit I was changing my mind on such a big thing felt kind of irresponsible at best, and indecisive at the worst. I brought down a loaf of zucchini bread and a copy of my new plan. Luckily the contractor had beat me to it (he texted the head carpenter after I had texted him). “It’ll work”. Is all my carpenter said to me, and then “We all wondered why the hell you didn’t design in bigger windows up there.”

So, instead of drywalling, painting, and putting in a kitchen and bathrooms this fall, I’ll be lucky if the subs’ portion gets finished so I can head back to civilization for the winter. And instead of putting on finishing touches in the spring it will be an all-out major do, pretty much starting from an empty shell. But I look forward to finally being able to put some of the things I learned in the DIY videos to use.

And, yeah, I’ll be taking another year off work.

IDEA 98: OUTWIT THE WEATHER

Weather_Light

Welcome to the continuing saga of the Up North House. This is the third post chronicling the inspiration, design and build of our multi family vacation house.

There’s one thing about building in the north. The weather is brutal. Winds to be reckoned with blow sand (in the summer) snow (in the winter) and ice, hail and rain all the other times of the year.

That’s why as we build a family place to last for many future generations, we are embracing materials that can withstand just about anything for just about forever.

The house will be sided in a material usually reserved around these parts for barns. It’s corrugated metal with a coating to resist rust. I read that it’s quite the thing in remote areas of Iceland. And why not use it?

Weather_siding

I love the rural aesthetic for up here, and the design of the house is based on the lovely barns dotting this landscape. It will be a house. But we will try our best to honor the bucolic, farm-y feel of the area.

End view:

Weather_East


Side view:

Weather_South

The very first things we purchased for the house were two beautiful full-view doors with Douglas fir on the inside and a natty overcoat of barn red cladding on the outside.

Weather_Door

We got these, used, for a song. And like everything about the design, they are simple, beautiful and since they will never need repainting, zero maintenance.

Typical for this area, our roof will be metal as well. You can see how the water beads right up, and with our 12:12 pitch roof, the snow will slide right off too.

Weather_roof_CU

One of the favorite choices so far are these beautiful barn lights we bought for over the doors. The galvanized metal has the dual role of not just weathering the storms, but looking just right: serviceable, with sweet barn character.

Weather_Barn_Lights

We’ve only just started, but as we continue to work, you can follow the progress of the build on Instagram #conboyhouseupnorth.

Eunice_BlueDiamond_Ad2

IDEA 97: FAMILY GLUE

Fam_Glue_Gathering

When your kids are living with you, it’s not terribly hard to make sure you are seeing each other on a regular basis. But when they leave the nest, especially when they move out of town, it can be a challenge to stay connected.

Many families have a tradition of vacationing at the same place every year whether it be a cabin they own, a resort they rent, or what-have-you. But what happens when the kids “outgrow” the family trip? The trip has to grow along with them. In our case, we are about to embark on something we consider a big investment in “Family Glue”. I wrote a little about it in the last post.

My childhood family of six (my parents, two brothers, sister and I) spent many summer days and nights in northern Michigan on farmland my father grew up on.

At its nearest point, the farmstead was about a quarter mile from lake Michigan. And if it weren’t for the apple and cherry orchards, the terrain of rolling green hills and bucolic farmland leading to high blustery bluffs formed by the crashing waves of Lake Michigan had to in some way remind the Irish transplants of their mother home.

As kids, we would trek back through the property to our favorite bluff that sent a straight shot of sand (with the occasional rock, plant and even glass) down to the pounding surf. We’d take off, flying from the top to land in the hot sand that only grew a little cooler as we descended with ever quickening speed to the beach below.

Once at the bottom we’d head north to a designated spot two miles up the beach where the bluff was lower, and some ancient sand-filled steps brought us back to the top where a parent would be waiting with the car to chauffeur us back home to the farmhouse. We’d arrive a little sunburnt, curly hair like dried snakes, and a rolling rhythm from the waves that magically stayed with us long enough to feel it’s push and pull as we lay in bed falling asleep.

This is where we went every summer. Every vacation. While my dad got busy repairing doors or windows and my mom brought ancient furniture out to the yard to strip and bring back to its original glory, we played.

When we began having kids of or own, we brought them to the farm. My dad was fond of saying every child born came to the farm by the time it was three weeks old. And I think that’s pretty close to the truth. Every new baby sat in the big oak rocker with Grampa Mike. And every child came to learn that the farm was where their Gigi served unending buckets of love, where they would come to know their cousins, where family happened.

Fam_Glue_warriersFam_Glue_beachFam_Glue_kids

Over the years, the old farmhouse began to feel the strain of the ever-enlarging family. We began bringing tents to provide more sleeping space, and tents became cabins. We created an outdoor kitchen, most of which got packed into a simple shack for the winter, and we cooked amazing meals and served them outside beneath a beloved open-air structure designed by my brother with huge logs from the land and a corrugated metal roof.

Fam_Glue_shelter_2

Most of the cabins were simple, with no running water, so the farmhouse was still the place to grab a shower and get out of bad weather. While each family created a cabin, the cousins just wanted to be with each other. So, although my generation of parents used our cabins, our kids tended to take over the farmhouse, many acres away.

The fact that there was a place for the teens and then twenty-somethings to get together has been key to making sure the young adults would continue to come “up north”. But the farmhouse was quite a ways away and we began to feel a divide. We also worried about the strain on the dear old house, and with the distance between us and our kids, connection was just more difficult. So, we’ve decided to build a Family House closer to our cabins.

Fam_Glue_BenchmarkFam_Glue_digger

As I write, the patch of land we designated is being scooped up and rearranged by a local excavator. We will have the shell built by a local contractor and spend the rest of this (and maybe next) summer finishing the inside ourselves. I’ll use this blog to communicate the progress. You can also track our progress on Instagram. Just follow #conboyhouseupnorth

Peace, love and good times!

IDEA 96: HONOR A MEMORY

Charlie Bird_CU_LR

As a kid my siblings and I spent many summer days on the shores of Lake Michigan. My father was born in Northern Michigan, and his family’s farmhouse, a quarter mile from the bluffs, was our vacation home.

One summer day in my childhood, we were exploring the beach. And we found a seagull struggling to free himself from a tangle of fishing line. The three pronged hook had pierced and caught the web of his foot as well as one of his wings. He must have tried to peck his way free as the third prong was now stuck through his bill.

My dad was able to free the hooks and untangle the bird, a favor that was rewarded with a bite on the hand. But it was clear the gull was not able to fly. By the time we were heading back south, our patient hadn’t improved, so we brought him back home with us. He was dubbed “Charlie Bird”. And as our city home was on a large natural pond, we figured we would try nursing him back to health there. My mom fed him tunafish until a naturalist friend told her he’d much prefer a fish from the pond (which he gulped down without hesitation). His physical therapy was administered by my brother leading him by leash down to the pond where Charlie would swim out and be gently pulled back.

Charlie’s time spent with us inspired my artist mom to create a mosaic of him. With broken pieces of colored tile, my mom depicted Charlie with wings spread wide in a perfect picture of natural energy and freedom. I imagine this is Charlie, right when he was freed from his shackles and ready to bite the hand that freed him!


Charlie Bird_3


On a trip home to my parents house, I was reminded of this amazing mid-century work of art. It’s an image so familiar to me, yet I hadn’t thought of it in years. We are now building a communal kitchen with sleeping quarters on the “Up North” land and this Charlie Bird mosaic will be featured prominently. I’ll create a color palette pulling from the blues, greens, whites, darks and grays. The vibe will be simple and natural. Like the sand, the trees and the wildlife we came to love, the house will let nature in and not be so delicate as to be wrecked by sand dragged in on bare feet or water from wet swimsuits (or feathers). The windows will be more about what you are seeing outside than architectural details inside. The spaces will be big and welcoming, as we rarely congregate with less than 20 people. The surfaces will be low maintenance, (who wants to spend all our vacation repainting). The house will be more about accommodating the people that gather than about it’s own self. But it will be designed with simplicity, and good, smart, frugal but beautiful ideas.


Charlie Bird_CU_2_LR

This Charlie Bird mosaic may not be the sole inspiration for this project. But it’s influence, both as art and as memory, will be honored and fondly felt.

IDEA 95: GET CREATIVE WITH 2X4s

2x4_Bench_Top

A few weeks ago my husband and I decided we needed to get out of the frozen tundra, so we took a road trip south to Wakulla Springs near Tallahassee Florida. It was there, on a hike, that I came across this beautiful, elegantly designed bench made entirely from 2x4s.

2x4_Bench_3-4

There wasn’t an ounce of give in the bench. It was permanently fastened in place, presumably the legs were set into poured cement footings underground, much like a fence post would be.

2x4_Bench_End

It goes without saying, this solution was as sturdy as you like. After all, the 2×4 is the building block of most every house and building on the block. But what I really loved was the thoughtful way the bench was conceived, using no more and no less wood than was absolutely perfect.

And it made me wonder what else could be made out of 2x4s. So, of course, I Googled it.

I shouldn’t be surprised that there are tons of posts about making things from 2x4s. After all, this is such an available and affordable source for wood. A 2×4 costs about $3. And it can be easily bought, brought home in your car, and cut up.

But in my opinion there is a big difference in the project ideas out there. And I decided to collect and present to you MY idea of the coolest 2×4 projects. My criteria includes:

•Finished piece has to be attractive, and un-2×4-like. (Crates, picnic tables and things like that are items I consider to be too 2×4-like).

•There has to be a reason to use a 2×4 as opposed to another form of wood (many designs call for slicing the 2×4 to make it into boards. In my book that’s too hard, and I would just buy boards. Or carving it into fancy moulding-again would make more sense just to buy the right molding).

•It can’t just be things cut into chunks and painted to look cute. (These are fine, but they’re more about the painting and less about the 2×4).

I noticed many (but not all) these tutorials “square up” the 2×4 first. I think removing those rounded edges looks awesome and makes a huge difference.

So, here are a few projects some amazingly clever people are doing out there. In each case I’m linking to their tutorial as they need to get credit for such fine ideas!

2x4_Vase_Shanty_2

This beautiful vase idea is so elegant. You may say it broke one of my rules as this is not a 2×4, it’s actually a 2×6. But I think it would be lovely in a 2×4, and IMO even nicer if you sharpened the corners so they were perfectly crisp. But kudos to Shanty Chic for the idea and tutorial.

Here is another vase, this one a little more complicated to make, but equally elegant. Find the tutorial for this one here.

2x4_SQ_Vase_inf

I love how this coffee table manages to be 2×4 and modern sculpture all at once. Find how to make it here.

2x4_Coffee_Table

The couple who made it was inspired by this table. I thought it very astute of them to make the connection between this table and their coffee table need.

2x4_SQ_Table

2x4_Modern Bench

As the tutorial says: Less is more! This bench shows how classy the 2×4 looks when the edges are sharpened. And I love how the interlaced wood makes for a dovetail joint look. This thing is gorgeous.

I absolutely love this lamp idea. If anyone makes this please send me the photo! So far there is just the drawing. Find the brilliant tutorial here.

2x4_TALL_Lamp

What’s not to love about this extremely minimal wine rack? I would probably sharpen up the edges and put the paint or stain inside the drilled holes as well. While I love the 2×4 idea, I would also want to hide its identity just a little more!

2x4_TALL_WineRack

While we’re talking simple, these 2x4s are cut and attached to form stair steps for the spice bottles to be displayed. While the idea is simple, I like how care was taken to finish the project in a clean white semi-gloss, and the bottles were labeled so the spice names can be read in any row.

2x4_SQ_Easy TieredNOTYPE

Anyone who follows my posts knows I just love a project that looks far more expensive or difficult than it was. I can’t wait to try out some of these!

IDEA 92: START THE YEAR OFF YOUR WAY

New_Years_Ornament

Do you find yourself having misgivings about the New Year’s holiday?

Has the prudent-you always felt a little uncomfortable sharing the roads with who knows how many party-hearty individuals?

Has the traditional-you felt the holiday tree and decorations needed to stay up through New Year’s Eve, especially when entertaining, but even when you weren’t?

Will the career-girl-you be back to work the day after New Year’s Day, meaning the opportunity to take down the tree will be pushed to the nearest weekend opening, which could easily be the end of January—if not February?

Does the lazy, cozy, introverted-you just not relish the thought of a big party? (Either to throw, or attend)?

Well, here’s a thought for next year (or tonight):

Light a fire in the fireplace (if you have one).

Put on music.

Open a bottle of red wine.

Grill filet mignon on the grill (yes, in the snow).

And “Take down Christmas”.

Now, instead of hastily gathering everything up to stash away, or worse, just feeling let down that the season has ended, take your time. The decoration boxes will be a little more organized, and you won’t have to worry about getting to it once back at work, (or whatever makes up your busy life).

I highly recommend you try it, if not now, next New Year’s Eve. It will make the chore different, like a tradition. And it will be lovely to wake up on the first day of the new year to a clean, vacuumed house with everything tucked back in their boxes, and your still beautiful tree stuck in a snow-bank in the back yard for the birds to enjoy till spring. Now, that’s a BellaPamella idea if I ever heard one.

New_Years_Tree

IDEA 91: MAKE A DAY-OFF TRADITION

DAY_OFF TRADITION_boxed

Do you ever experience an after-the-holiday lull? Not exactly down (or maybe a little down), more like, “Now what?”

Sometimes a day off is well spent noshing pudding while binge-re-watching your favorite Netflix series. But if that activity doesn’t feed your soul (or if you can’t get away with it in your particular household) why not have a holiday day-off tradition? This could be a Christmas Eve, Christmas Day, New year’s eve or New Year’s Day event. It can be on your own, or with family or friends. But the secret is to make it the thing you do, every year (unless you don’t feel like it, which is allowed because it’s YOUR tradition).

Mine doesn’t always occur on the same day, this year it was Christmas Eve, but for the last several years it’s been making decorated gingerbread animal cookies.

Over the years these have shown up on the BellaPamella Facebook page. And I think that’s how I discovered it has become a tradition.

We always use the same recipe from an old Williams Sonoma cookbook. You can find a similar one on line. But really any one would do.

The story is easily told in pictures. And I would just add that buying or finding some small boxes to allow any guests to take a few cookies home with them is truly the icing on the cookie. So to speak.

We find this activity to be calming as well as creative, something that really works in our house. Have a wonderful holiday season and remember, when in doubt, bake something!

DAY_OFF TRADITION_INGREDDAY_OFF TRADITION_WRAPDAY_OFF TRADITION_DOUGHDAY_OFF TRADITION_CUTTERSDAY_OFF TRADITION_cutDAY_OFF TRADITION_coolingDAY_OFF TRADITION_ready_for_decDAY_OFF TRADITION_deccedDAY_OFF TRADITION_wrappingsDAY_OFF TRADITION_boxedDAY_OFF TRADITION_Wrapped

DAY_OFF TRADITION_ad


IDEA 89: TAG THE TREES

Tree_Tags_Branch_1

Up in northern Michigan, the farm my dad grew up on sports some ancient apple orchards. The trees still produce, and the varieties are heirloom, if there ever were some. There’s not just the Jonathans, Macintosh and Golden Delicious, but Wealthy, Wagener, King and Alexander. Even now I can’t remember all the names, which is why this fall we made the rounds with my dad and we tagged the trees.

And it occurred to me, the project was so satisfying (and educational), why shouldn’t everyone do this with their own trees?

Of course most people don’t have an apple orchard in the family. But there really isn’t any reason you can’t identify and mark the trees you do have. Here’s what I did:

I bought aluminum tree tags online for the rich price of 100 for about ten bucks.

Tree_Tags_Blanks

You can write on these with a Sharpie if you like, but, not wanting to make things too easy on myself, I opted to purchase a set of “punches”. You can purchase the whole alphabet for about a dollar and a half per letter. My letters were about 1/4″ tall. There are lots of sets available. Just put “Letter Punch Set” in the search.

Tree_Tags_Letter_Punches_1

I bought aluminum wire and it came with a wire clipper in the package, which came in very handy.

Tree_Tags_Wire

And we cut long pieces, making sure to allow lots of room around the branches. We hung our tags much like a loose bangle bracelet, so as not to disturb the tree’s growth.

Tree_Tags_Branch_2

I learned a lot about our apple trees, but probably just as important, now our lovely trees sport shiny bangles that don’t just identify the fruit. Seeing the tags jiggle in the wind makes me smile as they betray the love with which these trees are cared for. It may not change the world, but it’s a very BellaPamella thing to do!

Tree_Tags_King

By the way, Happy Birthday, Dad. And thank you for sharing your knowledge, and your trees!

Tree_Tags_Dad